


Blue Ice Firecrest 28L vs 38L: In-Depth Comparison
- Greg Luesink
- Aug 3, 2025
- 11 min read
After using and testing both the 28L and 38L Blue Ice Firecrest packs on many adventures over multiple seasons, I have finally collected enough experiences to compare them across different uses. If you are trying to decide which size to get, keep reading. Or, like me, if you need evidence to convince yourself to buy both, read away!
Disclaimer: I am not affiliated with Blue Ice. Like all of my reviews, I'm just a big fan of the equipment, bought it with my own money, and wanted to share some insight to other gear-nerds.
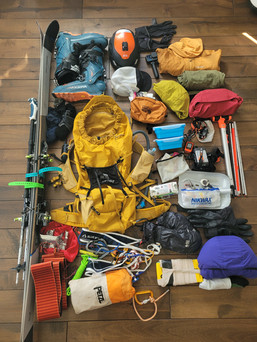
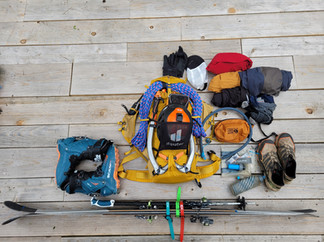
One frustrations I had when researching the Firecrest, was that Blue Ice did a poor job of highlighting the differences between the 28L and 38L packs on their website. Below are the features I wish they had displayed better, as well as the trips I have tested them on, which may help you decide on which size pack is for you.

I won't dive into every feature of the Firecrest 38L, as it shares many of the crucial features as the Firecrest 28L, which I wrote a very detailed review of. If you haven't read that, I highly suggest checking it out if you want an overview for features shared by both packs. Click the photo link for that review.
For this post, I will only highlight the few notable differences in the 38L pack, which all have to do with increasing volume and therefore, weight capacity:
Firecrest 38L Additional Features:
Wider Hip Belt: a larger pack can carry extra weight, and justifies a broader hip belt to better distribute the load on the hips. Blue ice did just that, widening the padding and increasing the buckle and webbing side as well. Don't worry! they still stow away behind the back panel.
Load Adjustment Shoulder Straps: a heavier pack can often pull a hiker/climber backwards while on steep terrain. For the 38L pack, Blue Ice added tensioning straps to each shoulder to offload/add-load onto the shoulders/hips. This is a great feature for the larger pack, allowing more weight to be on the hips for the approach, but also a close-to-body feel while climbing, all thanks to the extra straps. In fact, I wish they added these load lifter straps to the 28L as well.
Internal Wire Frame: the increased volume also makes this pack taller. While the 28L had no frame at all, making it a morphological pack for a quick hike to an alpine overnight, this made for annoying packing as the bag would flop over on its own. Meanwhile, the 38L includes a helpful wire frame to solidify the structure of the larger-volume pack. Once again, a wouldn't mind having a removable wire frame in the 28L, but understand the weight cost caused them to keep it out.


Usage Differences:
The best way I can think of to compare these two packs is to share the adventures that I used them on, and if I wished I have brought the other one. Notably, I bought the 28L first, and then about a year later I bought the 38L, so I didn't always have the choice between them. Here are some general guidelines I have for each pack:
Firecrest 28L
single day to one night
ski touring - short to medium days
alpine climbing - day trips
hiking and trail "running"
like an accordion, this pack shrinks and expands remarkably well. At the base of an alpine climb, all the gear comes out and onto the harness, the bag can be cinched down very small, minimally impeding climbing movement. Hip belt doesn't really get in the way of gear loops on the harness. Has an avy sleeve for rescue gear, but can be annoyingly floppy and too small for more complicated ski tours with more gear.
Firecrest 38L
single day to 5 days*
ski touring - long days
alpine climbing - overnights to multi-day
hiking/backpacking
great for heavier loads with load-distribution options on the shoulders, wire frame, and wider hip belt. The frame is a bit taller, which can impede looking up while climbing if it is too tight on the shoulders. Hip belt doesn't cover harness too badly even with padding.This pack is more sturdy for A-frame ski carry and ski-hook carry modes. Has not been tested for multi-day ski trips, but assumably a bit too small for that.
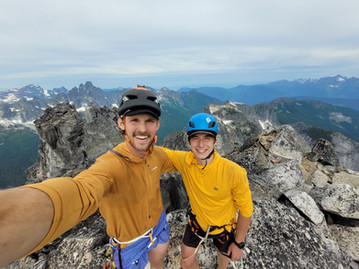
Winter Alpine Climbing
I'm more of a summer alpine kinda-guy, with not much experience in (nor risk tolerance for) snow and winter alpine objectives. However, I did dabble in February of 2024 on Canadian Border Peak with my friend Ben, using the Firecrest 28L pack. Here is what I found:
While Ben used his Osprey Mutant 38L, I toted my 28L. We both agreed it felt like a "big 28L".
With the help of a helmet-carry-net, I was able to attach my crampons to the outside, since they didn't fit inside my pack. Sandwiched between my helmet, I wasn't super concerned about the crampons falling out, but I did thread the cinch strap through the crampon bag tether just in case.
My pack was pretty well filled to the brim, but I somehow managed to strap my snowshoes to the outside for the FSR approach on gravel (not pictured).
The features on the pack worked well - the only thing I would omit is the soft flask on my shoulder strap as this was prone to freezing too easily. Nalgene in the pack and the insulated bladder would have been sufficient.
Verdict: As for function and comfort in movement, the Firecrest 28L did well for this outing. However, if I had owned the 38L at the time of this adventure, I would have opted to bring it for the extra internal volume.


Ski Touring / Backcountry Skiing
These last few winters, my wife Jas and I have enjoyed backcountry skiing. Pretty early on, I bought the 28L Firecrest and used it for everything from short day-tours in the Coquihalla on Zoa, all the way to summiting Mt Baker with Jas in the spring of 2024. Meanwhile, I have used the Firecrest 38L for trips like the Spearhead with Ben, and attempt of Baker North Ridge, and Jas and my bike-to-ski up Mt Cheam in Spring of 2025. Here is what I found:
For short, non-technical ski tours, the frame-less 28L pack was a little annoying if it wasn't filled to the brim, but was very comfortable to wear as it morphed to my back well. I was able to carry avy gear, extra layers, food, water, and (depending on length of a day) even stuff my helmet into the top of the pack.
For long, 10-15 hour ski traverses or volcanoes with higher gear demands, like skiing in the Garibaldi area and up Mt Baker, I was able to fit some extra Crevasse Rescue gear (harness, microtraxion, slings, biners, pulley), crampons, ski crampons, and a 30m rope in the 28L, often strapping things to the outside. Similar to climbing CBP, I had to stick the crampons between my helmet at pack, which was a little cumbersome but worked fine. While I used the 28L version for Garibaldi and Baker, I used the 38L for the Spearhead, which made it much easier to fit everything inside. A technical objective like Baker North Ridge called for more gear, and more pack volume, so I used the 38L to fit ice screws, ice tools, rope, crevasse gear, and avy gear. For a more complex overnight-bike-to-ski trip, Jas and I mixed bikepacking with ski touring and packed the 28L for her to use and the 38L for me. These worked great as day-packs for our summit push up Cheam from camp.
Verdict: I would take the 28L pack for short day tours and it does have enough space for medium to long days. If you don't have the most ultralight gear, I would recommend the 38L to allow for some more carrying capacity. The frame, larger hip pads, and load-adjustment shoulder straps also make the 38L a bit more comfortable for those days with heavier gear. I used the A-frame carry and the skimo ski-hook carry while using the 38L, and I appreciated the sturdier frame for boot-packing.


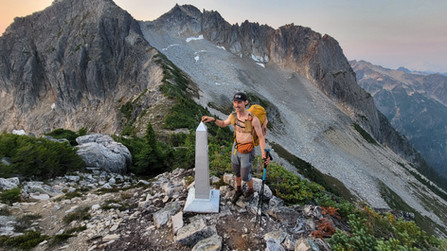
Summer Alpine Climbing & Hiking
\I've had the chance to test both the 28L and 38L during the summer, and found some overlap in use, while each shone on different trips. For the number of summer trips, I will separate the adventures to delve a little deeper into each. For summer of 2025, I owned both the 28L and 38L, which allowed a great comparison for what I was able to use each pack for.
Valhalla's Trip - Gwillim Lakes Backpacking
Jas and I really wanted to explore Valhalla Provincial Park in summer of 2025, so we did just that. In an effort to test the pack's capabilities, I loaded up the 28L for Jas and 38L for myself with an ultralight backpacking setup. Here's what I was able to fit in our sub-24 hour overnight strike mission (we left at 2pm at got back to the car before noon the next day).
Jas - 28L: down sleeping bag, bivy, sleeping pad, extra clothes, snacks, 3L water, plus 1/2 foam pad and sandals on exterior.
Greg - 38L: down sleeping bag, emergency blanket, 1/2 foam z-pad on exterior, food for dinner and breakfast, 3L water, MSR Windburner 1L stove, extra clothes.
It's worth noting that this trip was a little too ultralight, as we were faced with thunder and lightning on the hike in, which almost caused us to turn around because we didn't have a tent to stay dry in. I easily could have strapped a tent to the outside, but was intent on testing the pack for a future trip. Thankfully, the weather cleared right after I crafted a rudimentary lean-to from spare materials cached by the outhouse.
We had a great time, but if we were packing food for more meals than just dinner and breakfast (plus trail snacks), we would have needed more spacious bags. Also, the simplified packing list (i.e., no tent) for camping made these packs juuuust barely possible to bring.


Single-Day Alpine Climbing
Cheam Range Traverse in-a-day attempt summer '25
Canadian Border Peak summer '24 (CBP)
Slesse Peak summer '24
Mt. Rexford with Seth
Four separate outings stand out in my memory when I used the 28L Firecrest, which was the best pack for the job. All were single-day trips that required mostly scrambling, but also a bit of technical gear for rappels and a pitch or two of climbing. I was really happy with the carry comfort for heavier loads, with up to a single rack of gear and a 70m rope on my back (CBP). For other trips, I had a 30-40m rope and half-rack of gear or less. Of course, the water bottle sleeve and phone pocket are still one of the main reasons I love this pack, for it's "trail-running vest" convenience.
For summer alpine climbing or hiking day-trips, I can't imagine a better pack than the 28L. It has plenty of room for all the gear requirements, and comfortable for moderate loads. I would not choose the 38L for these day trip.s


Overnight & Multi-day Alpine Climbing
This category certainly stretches the limits of both packs, and I can happily say that they both performed well. Over three trips, I tested both the 28L and 38L from a1 night to 5 nights. I'll go into each with more detail:
Not only was this trip one of the most successful and rewarding due to the amount of terrain covered, but it felt like I had finally figured out how to pack light and move faster for an overnight trip. I used the 28L pack for this adventure in September of 2024 (I did not own the 38L at this time). Here's what I brought on this trip:
Sleeping Kit: 1/2 foam pad, sleeping bag, emergency bivy (used as ground-tarp).
Clothes: puffy and a wind-breaker.
Food: we did a no-cook trip, opting for cheese, cured sausage, and bars to save weight by leaving the stove behind.
Water - 3L bladder + 0.5L flask + 1.5L water filter flask = 5L.
Technical gear: small rack of a few cams/nuts/alpine draws, slings, rap tat, and 30m RAD line.
Emergency gear: repair kit, c-splint/tensor, inReach.
Note: I also brought a 2L hip pack to supplement pack size and carry some snack for quick access.


My friend Mike and I did a last-minute blitz-traverse of the Slesse Massif, likely the second complete ascent/traverse. Even more so than the Silesia Traverse, this trip tested our limits for ultra-light alpine climbing, exchanging many comforts for the bare minimum for survival. Mike borrowed my 28L, while I toted the 38L Firecrest. Here is what we packed and split between us.
Technical gear: 2x40m ropes, tuber belay devices, semi-double rack of cams and rack of nuts, slings, alpine draws, rap tat, microtraxions, climbing shoes, helmets, ultralight harness.
Sleep kit: 1/2 foam mat each, -1˚C sleeping bag (Greg), puffy pants/hoody combo with emergency bivy (Mike)...
Food: no-cook system, only ready to eat rations of sausage, cheese, and bars/trailmix.
Water: capacity for ~8L of water each, due to negligible refills on the ridge
Clothing: puffy, windbreaker, toque, gloves, extra socks. Pants/sun hoodie worn the whole time.
Emergency kit: repair kit/gauze/C-splint/tensor. inReach.
If you'd like the full breakdown, check out the link to read the write-up. In summary, Mike was shivering cold for the second (unplanned) bivy up on the mountain, but otherwise we were able to carry just enough extra food and water for us to make it through the trip.
For more serious alpine climbing with greater gear requirements, I would not hesitate to bring the 38L pack for better weight distribution and internal volume.


The Rexford-Slesse Horseshoe - 5 days and 5 nights*
You'll notice if you are the first to read this post, that there is no link. I haven't finished the write-up, so consider this a "sneak peak" to the biggest mountain linkup of my life. Ben and I used 38L packs, which both served to limit our weight-capacity so we could move faster, but also had enough space to pick up drop bags filled with food along our ridgeline traverse.
With that being said, a huge caveat to the 38L's abilities is that it (shocker) cannot hold 5 days worth of food and also hold all of the climbing gear required. I hiked in drop bags with food for 4 days, so we only had to carry 1-2 days of food at a time.
Here is what we had in the bags for the entire trip:
Technical gear: 2x40m ropes, tuber belay devices, semi-double rack of cams and rack of nuts, slings, alpine draws, rap tat, microtraxions, climbing shoes, helmets, ultralight harness.
Sleep kit: 1/2 foam mats, -9˚C sleeping bags, emergency bivies as ground tarp, one 3x3m tarp with tie-downs
Food: we packed a stove for this trip, boiling water for dehydrated dinners. We cold-soaked chia-oatmeal and trailmix for breakfast. Ready to eat sausage, cheese, and bars/trailmix, then tuna packets for the drop bags.
Water: capacity for ~8.5L of water each, negligible refills on ridge
Clothing: puffy, windbreaker, baselayer, toque, gloves, 2x extra pairs of socks, 1x boxers, extra sun hoodie. Pants/sun hoodie worn the whole time.
Emergency kit: repair kit/gauze/C-splint/tensor.
My friend Mike and I had attempted this traverse in 2024, and I used my MHW Alpine Light 50L pack, which ultimately allowed me to load way too much gear on my back for a trip like this. After a bunch of testing, I finally landed on the Firecrest 38L for this adventure.
It was ironic that Ben had been using his Osprey Mutant 38L for several years of adventures together at this point. On the Cheam Range Traverse, Ben had his 38L, while I had a 65L. Then I used my 50L for a while on our alpine climbs, then I used a 28L, and finally, I started using a 38L... all the while Ben just kept using the same bag.


Conclusion
After all this time with both the 28L and 38L packs - I'd have to choose the 38L for my "quiver-of-one"... but who are we kidding, there's no such thing - that's why I have both ;)
I hope this comparison review has helped you make a decision on if this pack is for you, and which volume suits yours needs and interests. Please feel free to comment and ask any questions that I didn't think of in this post or the In-Depth Review of the 28L. I'll try my best to answer promptly!